Tag Archives: green

Stuff I Love!

My friend Lindsey at Life Full of Whimsy is trying to purge her house of all her extra “stuff”.  That’s something I understand.  But, she also realizes that there are things in life that are useful, helpful and even necessary.  Yesterday she posted “What’s in Your House~Wednesday” and shared the reusable bag that she got from the Family Wisdom Conference on Saturday.  She wants you to share the things in your house that are really useful. 

I decided that in the spirit of “What’s in Your House” and in honor of Earth Day I should share my Abi*bags with you. 

reusable sandwich bags

Fully lined reusable cloth sandwich bags.

I asked her for “boy” prints because I ordered these mostly for my son.  She knows I have chickens, so I especially love the rooster print but I really like all the patterns she picked for me. 

The kids and I have been using wax-lined paper bags for our sandwiches for a while now but these are keeping our bags out of the landfill and saving me money on bags in the long run.  Mr. Hippie has always used plastic wrap to seal up his sandwiches.  When he found these in the kitchen drawer he became a convert.  The skull and crossbones bag on the end is now Mr. Hippie’s sandwich bag of choice.  Since Mr. Hippie packs his lunch almost every day, his reuseable bag is keeping a ton of plastic out of the garbage and saving me money on plastic wrap.

Each bag is lined, seals with velcro and easily holds a sandwich or snacks. 

Sandwich on a large hamburger bun.

Sandwiches fit nicely into the bags.

This is Dylan’s club sandwich on a bun.  It fits easily into the baggie and my 8-year-old can even pack it himself. 

So, that’s “What’s in My House”.  If you like the bags and want them in yours, check out Lindsey’s Etsy site.

5 Comments

Filed under crafts, green living

How I Made Homemade Soap (and Didn’t Screw it up)

I’ve attempted this before, but it didn’t work out so well.  You can see the finished, botched soap in this post

This time, things worked out much better.  Just like the first time, I started with bacon fat.  

Jar of dirty pork fat

Upcycling this dirty old jar of grease.

 And, just like last time, I washed the fat.  However, this time I decided to use only one jar of fat instead of two.  This helped speed the process up measurably.   I washed the fat twice just like last time to get out all the residual bacon bits.  

What I knew this time that I didn’t know the first go round is that washing the fat takes longer than any other step in the process.  You can save yourself a lot of time in your soap making by using other fats that are already clean.  Olive oil comes to mind.  So does coconut.  You can even find directions on the internet for Crisco based soaps.  For now I’m sticking with bacon fat because I always seem to have some around and I don’t have to buy it.  Someday I would like to try an olive oil (castille) soap but I’m going to refine my skills with bacon grease first. 

Fat after washing twice.

Washing the fat is the longest step in the process.

Now that you’ve washed your fat, it’s time to actually make some soap.  My directions from the first experience were pretty thorough, but I learned a few things along the way so I’ve added those golden nuggets of wisdom so that you don’t make the same mistakes I did.  

  1. Clear your workspace of young children and pets.  Lye is not dangerous if you respect it and follow safe handling precautions, but children and chemicals don’t mix.
  2. Weigh and melt the fat. 
    Melted soap fat

    The fat liquified and ready to be made into soap.

    THIS IS VERY IMPORTANT.  Inaccurately measuring my ingredients was the biggest mistake I made the first time I made soap.  I used too much lye and the result was a chalky, crumbly soap.   This time I got a more accurate kitchen scale.  I want this fancy-shmancy one but I’m not willing to spend that much money on it.  I found a used one for $60 but I wasn’t ready to spend that much either.  We’ll see how much soap I actually make before I start forking out the big bucks on equipment.  My new kitchen scale cost $1 at the Women’s Resource Center.  It seems to work just fine for what I need. 

  3. Once the fat is melted, use this lye calculator to determine how much lye you will need. 
    Water on the scale

    The mass of the water only; I set the scale at zero with the measuring cup on it.

    It will tell you how much water and lye you need based on the type and mass of fat you have.  It will even let you use multiple types of fat so that when you become a soap expert you can create new recipes. 

  4. Once you have calculated how much lye and water you need, sprinkle the lye into the water IN A HEAT-PROOF GLASS CONTAINER and swirl with a silicone or rubber spatula.  (This is an exothermic reaction and gives off A LOT of heat; use caution.)  This is where I made my second mistake the first time I made soap.  I knew the lye mixture would be hot.  I knew it needed to cool.  I just wasn’t sure how much it needed to cool. 
    The solution is cool enough to use now.

    The lye-water solution has cooled to about 82 degrees.

    I talked to my soap-maker friends and learned that the temperature of both the lye-mixture and the fat are critical to the finished product.  Here the lye has cooled enough to combine with the fat.  It is just over 80 degrees.  The fat should be about the same temperature; warm enough to be liquid, but not too hot.  If your fat and lye solution are too warm, the resulting soap can be brittle.  (Like mine was last time.) 

  5. Once the fat and lye are both under 100 degrees slowly and carefully pour the lye solution into the fat and stir continuously with a stick blender.
    lye mixture combined with the fat

    Stir the mixture constantly once you have added the lye.

    It will take quite a while for the mixture to thicken up to the right consistency.  (Especially if you have measured your ingredients correctly; my soap reached trace really quickly the first time because I used too much lye.)  Don’t stop stirring even when your arm gets tired.  The soap is finished when it reaches “trace”.  Trace is when you can see where you have been mixing.  In the photo you can just see the path where the blender was.  

    Soap is almost ready

    The soap is ready when you can see where you were just mixing. This is called "trace".

    And, in the sake of complete disclosure, this photo is from the last batch of soap; the picture of trace from this batch wasn’t so great.  If you are going to add fragrances or herbs, now is the time to do it.  Last time I added dried lavender blossoms.  That was a waste of perfectly good lavender blossoms.  They turned brown in the process instead of being lovely little purple flecks like I’d imagined.  This time I stuck with straight essential oils.  I’m particularly fond of lavender in my soap so of course, I used that but I added lemongrass again too.  

    essential oils

    Lavender and lemongrass essential oils.

    I didn’t add enough oil this time so the soap is only slightly scented.  Next time I will add much more.  One of the reasons I like homemade soaps (both mine and Fish Creek’s ) is that they make the bathroom smell lovely instead of all soap-y like commercial soaps.  The last time I opened a bar of store soap, it about made me gag.  It’s amazing how artificial artificial fragrances smell when you get used to smelling real smells again. 

  6. My friend Alicia keeps me in soap molds. 
    Will this make my soap goldfish-shaped?

    Upcycling trash into treasure.

    She provided the silk container (which wasn’t big enough for two jars of bacon fat-soap last time) and this giant Goldfish container (which was actually too big for only one jar of bacon fat this time).   Once you have blended in any fragrances you want to add, pour the liquid soap into the mold and let it cure for 18-24 hours. 

    Soap poured into the soap mold

    Finished soap in my fancy soap mold.

    Once the soap has cured for a day, you can remove the soap from the mold.  Or, if you upcycle an old container like I did, you can just peel the mold off of the soap and discard it.  I forgot to take a picture of the soap before I started cutting it, so I had to push it back together to provide you the illusion of “whole-ness”:  You get the idea.

  7. After you’ve cut your block of soap into bars, all you have to do is wait.  Soap needs to cure for awhile.  At least three weeks is recommended, but the bars will get harder and drier with age. 
Nothin' left to do but wait.

The freshly cut bars biding their time.

So, I haven’t used the bars yet but they cut smoothly and didn’t crumble or get chalky like the last batch so I’m assuming all’s well for now.  They seem to be curing nicely and will be ready for use soon.  Now that I’ve figured out the process, I think I’m ready to start playing with some recipes.  Like maybe this one.

26 Comments

Filed under crafts, frugality, green cleaning, green living

Dark Days Week 16 PM Edition~ Coq au Poivre

I’ve wanted a pressure cooker for a while.  Ever since I started canning again I’ve considered the possibilities that would be open to me if I had one.  Stock, low-acid vegetables, soups and dinner starters can all be safely canned with a pressure cooker.  Plus a pressure cooker can be used to speed up cooking time of beans and meats.  I researched various canners on Amazon, eBay and other online sites and was surprised by the cost.  I checked at the resale shops.  I found a couple of smallish cookers that were still fairly pricey and was almost ready to settle for an expensive, little cooker.  

And then, my friend Mike brought me this:  

My new pressure cooker

Yay! I've wanted this for a while.


I love that guy!  His wife is awesome too.  They are the most generous people you will ever meet.  They make soap.  I wish they had a website so that I could link it because their soap is amazing.  Maybe someday I will be able to replicate their soaps but for now I’ll have to settle for flops like mine.    

Anyway, back to the story.  After I roasted the last rooster I decided that future roosters needed to be cooked longer, or immediately souped.  The chicken had delicious flavor, but because they were older than normal meat birds and had been allowed to free-range, the legs were tougher than you’d like.  But then the pressure cooker arrived and I decided to try pressure cooking the rooster.  And guess what?  Success!  

I heated the pressure cooker and drizzled a little olive oil into the bottom of it.  I salted the chicken and rubbed a ton of cracked pepper onto it.  Then I threw the bird into the cooker to sear it and turned it until it was browned on all sides.  I added some fresh rosemary and a couple cloves of garlic and then added water until the roo was nearly covered.  I threw in half a dozen diced Yukon Gold potatoes from my “root cellar” and screwed the top onto the pot.  Then I put the pressure gauge on the pot to set ten pounds of pressure and turned the heat up until the gauge started to wiggle.  I set the timer for fifteen minutes and started the biscuits.  Yes, you heard me correctly, fifteen minutes!!   

Coq au Poivre

Pressure cooked rooster and veggies.


The biscuits mixed up quickly and I threw them into the oven.  The timer went off signaling that the chicken was done, so I turned the burner off and got the broccoli ready to cook.    By the time the biscuits were done, the pressure cooker had cooled enough that I could open it and check the chicken.  It was thoroughly cooked!  Even better, it was tender.  However, it was not crispy.  I removed both thigh/leg portions and put them on a sheet pan and threw them in the oven for a few minutes at about 400° to crisp up the skin while I cooked the broccoli and plated the rest of the dinner:  Broccoli from the freezer (Providence or Olds Farm, I froze broccoli from both), Yukon Gold potatoes from Westmaas farms in Marion via the “root cellar”, homemade biscuits from my stash of spelt flour, and home canned cranberry sauce that I made in the fall with Michigan cranberries.  

Even if I’m not cooking old roosters, I’ll definitely use the pressure cooker again.  It is so much quicker, and saves a ton of electricity!

9 Comments

Filed under Dark Days, food, frugality, green living

How to Raise Worms

As I may have mentioned before, I am very cheap frugal.  Our city doesn’t provide garbage service so each household is responsible for contracting their own service.  There are four or five different companies that provide service to my street (and unfortunately, four or five trucks that drive down my alley every week because of it) so there are a lot of options for trash pick-up.  Most of the companies offer recycling as part of their fee but they only take number one and two plastic so I haul all my recycling to a drop-off site that takes batteries, small corded appliances, glass, cardboard and paper, metal and ALL plastic including numbers 1-7, plastic bags and STYROFOAM.  Recycling all that “junk” eliminates a huge chunk of my garbage output.  Compost takes care of another chunk. 

Because I compost and recycle most of my garbage, my family of four creates less than one eight-gallon garbage can full of trash a week.  So, why would I pay $10 or $20 a month to have that little bag hauled away every week?   A couple of the garbage companies offer a “pay for what you use” plan for garbage.   You buy the color-coded bags from them (ten bags for $25) and only put out the garbage when you fill the bags.  I can fit three or four of my little garbage bags into one of their big bags.  If you do the math, that works out to about $2.50 every three-four weeks.  This ends up costing me under $50 a year instead of $120 or more.  So, even if I didn’t use my compost in the garden, it is worth its weight in gold!

Many people have tried their hands at composting only to find that they don’t have the space for a big pile, or can’t manage turning the pile, or just can’t get the balance of carbon (brown things) and nitrogen (green things) to work out for optimal composting.  I was am one of those people.  Oh, don’t get me wrong, I still compost.  I have this giant pile in the back corner of the yard:

Compost heap

Compost heap buried under snow.

And I have these two (soon to be three) compost containers: 

Duelling Composters

The one on the right is full and working. The left one is nearly full. I'm going to get a third and make a three-bin compost system.

But, several years ago I was introduced to vermicomposting.   I have been in love with it ever since.  Vermicomposting is a fancy name for “worm farming”.  Yes, I am a worm farmer.  I usually keep a worm bin at school and one at home.  Right now I have both bins at home, but plan to return the old bin to school in the spring.  In the summer I keep the bins in a shady area of the yard but for now they are in my “dining room”.  (The realtor called it a dining room, but he was being generous.  It is actually a wide hallway between the kitchen and the back entryway and more of a mudroom.)  I’d keep the worms indoors all year, but for me they are just easier to deal with outside.  I never have to worry about  fruit flies, and I get six square feet of floor space back.

There are lots of things I love about worm farming.  The biggest reason is obvious: worms eat my garbage.  Mary Appelhof wrote a book by the same title.  Worms eat garbage all day every day.  A pound of worms will eat a half a pound of garbage a day, or three-and-a-half pounds of garbage a week.  Worms are more efficient than a compost pile.  Worms eat garbage and turn it into rich compost in a very short time span.  This compost is called “castings” which is just a fancy word for worm poop.   Castings can be added to houseplants or garden beds.

As I mentioned before, I often keep my bin inside.  This makes vermicompost much more manageable for people with small yards.  Even an apartment owner could compost using this system.  I keep my bin out in open sight, but a bin could easily be tucked into a closet or cupboard.  So convenience is a big reason I love my bins; you never have to leave the kitchen to compost if you keep the bin close by.   You’re probably thinking, “Don’t they stink?”  No, they don’t.  A properly maintained bin smells like soil.

The best thing about a worm bin is that it requires no turning.  To get compost from a pile or bin in a reasonable time frame, the pile needs to be stirred or turned.  If you have a small pile, this isn’t too difficult, but small piles aren’t as efficient as large piles.  Large piles are faster, but are a real pain to turn.   Worms actually prefer that you don’t turn them. 

So, now that you know why you should have worms, let’s find out how to raise them.  There are a number of resources on the internet to help you get started, but let me walk you through the basics.  First you need to provide suitable habitat for your worms.  There are many vermicompost systems available for sale and for a fee, I’d be happy to build one for you but it’s pretty easy to do yourself.  You’ll need a plastic storage contanier and two lids, a drill and a 1/8th inch bit.  The plastic tub must be opaque; worms don’t like light.

Rubbermaid tub and two lids

Scavenging extra lids can be a problem. I had these two left over from when I built my newest, deluxe, three-tiered worm bin.

Flip the tub upside down and drill drainage holes in the bottom of the tub.  Make sure you drill the holes in the low spots of the tub or liquid will pool in the bottom and create less than ideal conditions for your worms. 

Bottom of the bin with drainage holes drilled in it.

Once you have drilled the holes in the tub, turn it right-side-up and put ONE of the lids on it.  Drill holes in the top to provide air flow to your worms. 

Finished worm bin lid

Worm bin top with air holes drilled in it.

Now that you have a container for your worms, you need to fill it.  Worms need bedding.  Remember when you cleaned out your filing cabinet and shredded all your old documents??   Go get them and use them to fill the bin most of the way.  If you don’t have any old documents or junk mail to shred, you can use shredded newspaper or cardboard. 
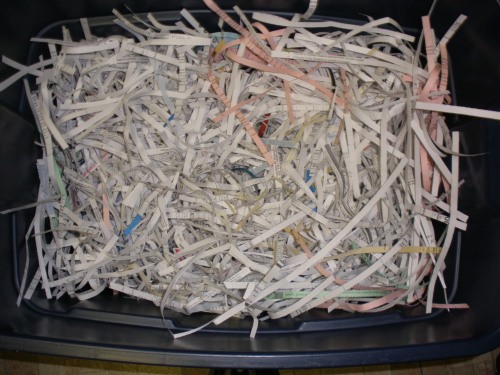
Upcycling your junk mail

Finished worm bin with bedding added.

Many sites will advise against using colored paper in your worm bin because the inks can be bad for the worms.  I have never had trouble with it, but I don’t add a lot of colored paper; in small doses, colored papers are fine.   (Note: Don’t shred the plastic windows from your junk mail into your worm bin unless you want to pick plastic ribbons out of your castings until the end of time.)

You are probably wondering what’s up with the extra lid.  Unless you want water and worm tea dripping out the bottom of your worm bin all over the floor, you will need to invert it and place it under the bin as a saucer to catch drips.  If you keep the bin outside, you won’t need the extra lid.  If you haven’t been able to scavenge an extra lid, you can place your bin inside another tub or rig some other way to catch the drips.  However, the extra lid is the easiest method.

Finished worm bin

The finished worm bin. This particular worm bin was auctioned off at the Family Wisdom Conference's Wise Woman Ladies Night.

Worms, like humans, are mostly water.  The environment needs to be damp.  If it isn’t, your worms will lose moisture through their skins, become dehydrated and die.  We’ve all seen those poor worms dried out on the sidewalk after a rain; no good worm farmer wants to do that to his stock.  To create the right humidity, dampen the bedding but DO NOT flood it.  The bedding should feel like a wrung out sponge after you have added the water.  If your bedding is too damp, either squeeze most of the excess out, let some drain out the holes before you add your worms, or add enough dry paper to the bin to absorb the excess moisture.   If your tub starts to accumulate too much moisture, the worms will start trying to escape just like earthworms do after a rainstorm.  Once your bin is established, you generally won’t need to add too much water but if the box ever seems dry, sprinkle a little water in until it seems damp enough.  Most of the kitchen scraps you add are mostly water and will keep your box adequately moist.  Adding a piece of cardboard, a piece of burlap or an opened newspaper to the top of your compost helps retain moisture, but I rarely do this.

Now that you have a container and bedding, you are ready to start.  Worms don’t have teeth.  They have gizzards instead.  In order to function properly, a worm’s gizzard needs small stones in it.  A handful of sand or dirt from your yard sprinkled onto the bedding will provide enough stones for your worms to get started.

Next, add some food for your worms.  The worms will eat the paper you have provided for bedding, but they prefer rotten food.  Rotten is the key word here.  The worms actually eat the mold and fungus that consumes the food so the more rotten your food is, the better it is for the worms.  If you don’t have any rotten scraps, fresh ones will do; they’ll rot soon enough.  Don’t add too much food to your bin at first.  Your worms will need time to adjust to their new surroundings.  Once your worms become established, they will reproduce and will be able to eat more garbage.  The more you feed them, the more worms you will have.

You are finally ready for your worms!  Believe it or not, there are many, many types of worms.  The common earthworm, nightcrawlers or bait worms you buy at a fishing shop are not good for your bin.  They don’t eat enough garbage and will probably die and smell up your bin.  Your worm bin needs red wiggler worms.  There are many sources for worms online.  Most of these sources are very pricey.  If you are in the Traverse City area, I’d be happy to sell you a pound of mine for $20, but at the moment I am not set-up to ship worms and I wouldn’t want them dying in the mail. 

That’s it.  You’re done.

Now that you have your bin set up and the worms have moved in, what should you feed them??

  • Coffee grounds
  • Tea bags
  • Fruit and vegetable scraps and waste
  • Spoiled food from the refrigerator
  • Shredded up junk mail
  • Eggshells
  • Nutshells
  • Old socks and non-synthetic clothing (No, really.  I once fed my worms a cotton sweater.)
  • Weeds and trimmings from garden or houseplants

Things you should never feed your worms:

  • Meat
  • Dairy
  • Greasy items
  • anything that wouldn’t biodegrade on its own
  • cat or dog waste

After a while, the bedding and food scraps in your bin will be unrecognizable because they will have been turned into rich castings.  When this happens, you will need to harvest your castings because worm castings are toxic to worms.  What?  You wouldn’t want to swim in your feces, would you? 

Check back soon for a post on harvesting your castings!

6 Comments

Filed under crafts, frugality, gardening, green living

How to Make Your Own Soap (Concluded)

This post is the third in a series of posts.  If you haven’t read Meat Day or How to Make Your Own Soap, you may want to go do that now. 🙂

  1. Empty carton upcycled
  2. Upcycle an old soymilk carton into a soap mold for your homemade soap.

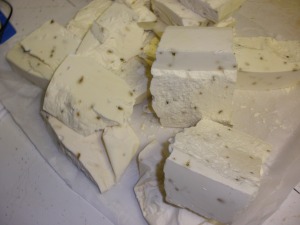
Okay, maybe this isn’t the conclusion to my soap story.  However, for now it is.  I cured my bacon grease soap in the upcycled Silk carton soap mold over night just like I was supposed to.  I peeled away the carton and started slicing the soap into bars to find my soap fragile.  Crumbly.  In fact, it looked much like blocks of feta cheese: smooth-ish on the top and crumbly-jagged on the sides where it split when I tried to cut it into bars.

Tea Tree, Lavender Homemade Soap Bars

Crumbly batch of homemade soap.

I should have known to leave well enough alone.  I started troubleshooting soap flaws online.  I found that crumbly soap could be the result of a few things.  One could be too much lye.  Since I don’t have a very good scale, that was a possibility.  Or, crumbly soap could be caused by mixing the ingredients at the wrong temperatures, stirring too much, or not stirring enough.  I wasn’t sure which of these were the culprit, but from my research I determined that I could rebatch or remill my soap.

So, I ground the soap up and threw it back in the pan.  I added a little more oil (olive, ‘cuz that’s what I had) and some hot water and stirred it.  The soap looked like it was coming back together, so I dumped it into a  large, glass loaf pan.  I’d have used a milk carton, but I’d already used the only one I had.  It was at this point I saw my soap separating.  It hardened up fine, but there are holes where the unincorporated oil drained out.  Maybe I didn’t need that olive oil after all, huh?

  1. The bar I didn't remill.
  2. I should have just left the crumbly bars alone; they looked way nicer like this than they did after I remilled them.

So, what have I learned from this experiment?

  1. Don’t bother putting dried lavender blossoms in your soap; the color all cooks out and they just look like brown flecks.
  2. I need a good kitchen scale.  Accuracy is important in soap making.  I might’ve been able to avoid my remilling fiasco if I had measured more accurately the first time.
  3. Remilling is not for me.  The remilled soap is so ugly that I won’t even take a picture (and I’ve posted some ugly pics in the past.)  Once the ugly soap has cured and I’m sure it’s not too alkaline, I plan to grind it up into my laundry soap.  If I get a crumbly batch in the future, I’ll just grind it up from the start instead of wasting six hours trying to remill a lost cause.

This is not the true conclusion of my soap making, because I’ll definitely try again.  Now that I have all the kinks worked out, it should be much easier next time.  I will only use a quart of bacon grease at a time.  “Washing” the bacon fat takes WAY too long if you have to wait for it to cool between heatings.  I’ll probably also use a blend of oils to end up with a soap that is more balanced and better for my skin.

Check back soon.  I bet I’ll have enough fat in a few weeks; my bacon jar already has at least a half a cup of grease in it!

For a more succesful soap experiment, check out How I Made Homemade Soap (and Didn’t Screw it up).

9 Comments

Filed under frugality, green cleaning, green living

Meat Day (or, How to Make Your Own Soap)

Despite my efforts to live simpler, be greener and eat healthier, Mr. Hippie likes him some junk food. To that end, we have something that has become known fondly as “Meat Day” in our house.  Meat Day is when the boys in my family consume a pound of bacon and sausage. I do my best to buy local sausage and nitrite/nitirate free meats, but let me tell you, that stuff’s expensive.  So, some “Meijer Meat”, as my daughter and I have taken to calling industrially produced meat, sneaks through. I try to trick them into eating healthier by serving eggs, potatoes, and pancakes or french toast with their meats, but that doesn’t change the fact that they are consuming copious amounts of pork products.

With pork products come pork fat.  There are many uses for pork fat.  I add some into my dog biscuits and homemade dog food, but that poor dog couldn’t possibly eat all the bacon grease produced by Meat Day.  (Well, he probably could and would love every second of it, but it would be a messy, messy walk the next day.)

That's a lotta grease!

Hmmm. . . Maybe we should cut down on Meat Days?

So, what do you do with all that grease?
If you’re like Ivory Soap and Tomato Lady at Little House in the Suburbs, you make soap with it

I have friends that make soap, and I’ve always wanted to make soap, but I have been intimidated by the lye-factor.  But, when you have this much grease, intimidation becomes an afterthought to, “I have to get these damn jars of grease out of my kitchen!”

So, here goes.

  1. Microwave the jars of grease for a minute until they are soft enough to dump into a big pot.
  2. Fill the jars with water and add the greasy water to the pan.
  3. Bring the greasy mess to a boil.
  4. Remove the mess from the heat, stir it and add a jar of COLD water.
  5. Let cool until the fat hardens on top.  (I put mine on the back porch to speed thing up, but it is January in Michigan~you may need to use the refrigerator, or wait a really long time.)
  6. While the fat is cooling, stir up a batch of homemade bread and then make a batch of homemade laundry detergent. 
  7. Write a post about the detergent
  8. Check on the fat and water.  See that it is still warm.  Decide that even though it is January, the porch isn’t cold enough.
  9. Move the pot of fat and water to the fridge.
  10. Make Homemade Fabric Softener.
  11. Write a post about Fabric Softener.
  12. Check on the fat.  See that it still isn’t hardened.
  13. Turn the oven on and bake the bread.
  14. Become impatient.  Make space in freezer for fat.
  15. Wonder why I didn’t cook the fat in smaller batches to speed cooling time.
  16. Run to Tom’s to buy habañero peppers for this recipe.
  17. Start dinner.
  18. Check on the fat.  See that it has finally hardened.
  19. Take it out of the freezer.
  20. Scoop the fat out onto a plate.
  21. Dump the nasty brown water and bacon bits out.
  22. Cooked Soap Grease

    The bacon fat after one cooking and cooling. See how it's still yellow?

    Check to see if your grease still has too much “gick” in it. Wonder how long it will take to do it over again so that the resulting fat is cleanish.  If your fat is clean the first time, lucky you!  You can now start actually making soap.  If not, continue on to step #23.

  23. Crack a beer.
  24. Clean the grease pan.
  25. Scoop the fat back into the pan, add two jars of water and return to a boil.
  26. Remove the pan from the heat and add a jar of ice water.
  27. Place the pot of fatty water directly into the freezer.  Wonder for a second how bad it is for the freezer to put that steaming pot in it.
  28. Take a drink of beer.  Finish cooking dinner.
  29. Eat dinner.
  30. Start making chocolate chip cookies.
  31. Hellfire Cookies: Step 1

    Diced Habañeros soaking in warm milk.

    Start making  habañero cookies.

  32. Check the fat.  Decide that even if the fat was hard, it is too late to start soap today anyway; move the tub of fatty water back out to the porch to finish next weekend.
  33. Put the icemaker receptacle back in the freezer.  Finish the cookies.  Go to bed.


This post continues here with actual directions on making soap!

5 Comments

Filed under food, green cleaning, green living

Homemade Fabric Softener

Maybe, like me, you’re trying to green up your home.  Or maybe, also like me, you’re cheap budget-conscious.  Either way, you are going to LOVE this recipe.  Actually, this is more like a non-recipe. 

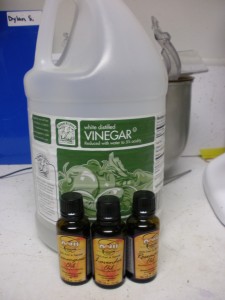
Vinegar and oil(s)

See, a non-recipe

1.   Get a big jug of white vinegar.
2.   Add some drops of essential oil for fragrance. I used lemongrass, lavender and rosemary so that it would match my Homemade Detergent, but oils are completely optional!
3.   Go do laundry.

That’s it!  See how easy going green can be?  You may be thinking, but won’t my laundry smell like pickles?  No!  That’s the beauty of it.  The vinegar smell dissappears when the vinegar dries.  You don’t actually have to add any fragrance, but it does linger on your clothing slightly, so I do it because I like it.  You don’t have to.  Vinegar helps the detergent rinse complete from your laundry and naturally softens the clothing without the toxic chemicals in traditional fabric softeners.  Plus, it helps clean your washing machine.

But, being green is only one advantage of this softener.  As I mentioned before, this will save you $$! 

Liquid Fabric softener

I just refill this bottle with my vinegar and a few drops of essential oils.

Now, even when I used toxic fabric softener, I used sheets.  But, one summer my sister and her family stayed with us.  She was kind enough to leave behind this bottle of Downy for me.   If you’ll notice, the price tag says, “$6.79”.  That price is from 2003, so it may be more.  I really have no idea.  If you’d like to weigh in on this matter, please feel free to leave a comment.

Anyway, back to the math.  For $6.79, you can soften 52 loads.  That works out to about 13 cents per load. 

I use the lid from this Downy bottle to measure my vinegar, so I use the same number of ounces per load (0.85 oz.) White vinegar comes in 1 gallon jugs.  I pay $1.69 for a gallon of vinegar (128 oz.)  1 gallon of vinegar is just over 150 loads.  That works out to about 1 cent per load.  Even if you add essential oils, it wouldn’t be more than 2 cents per load if you paid a LOT for your oil.  My oils are in the $3 price range so I don’t even figure them into the price because the 20+ drops I put into the Downy bottle barely cost a nickel.

Even if you only wash 1 load of laundry a week, (and who does that??) you would save over six dollars a year.  Not to mention eliminate gallons of toxic chemicals from the water supply and avoid long-term skin contact with these same chemicals.  If you do five loads a week you’ll save over $31 a year.  Imagine what you could save over a lifetime of doing laundry!

If you like green cleaning products, you’ll probably like my Sink Scrub recipe, too.

24 Comments

Filed under frugality, green cleaning, green living

Homemade Laundry Detergent

I’ve been meaning to make my own laundry detergent for quite a while now.  I’m not sure what But the four jugs of “buy 1 get two free” laundry detergent I had kicking around the laundry room kept me from doing it until now.  Now, those yucky grocery store bottles of detergent are all gone so I can make my own.  This is so easy, everyone (including you) should go make some.   I wrote the recipe on the side of my container so that I wouldn’t have the trouble of losing it like I did with my dishwasher detergent.

Angela’s Laundry Magic:

Homemade Laundry Soap Recipe

Now I can never lose the recipe!

Remember how much I LOVE my Kitchenaid mixer? 

Grinding the bars of soap.

Oh, Kitchenaid, how I love thee!

One more reason: It grinds up bars of soap in no time flat. 

Shredded Bars of Soap

Shredded up bars of Kirk's Coco Castille.

I used Kirk’s Coco Castille for this batch because that’s what I bought months ago when I got it into my head that I would start making laundry detergent, but I will NEVER use it again for two reasons.  One, it is expensive; you can use Ivory soap or homemade soap instead.  And, two it has such a strong scent that I can’t stand it. 

Once you have the bars of soap ground up, dump them into whatever container you are going to use to hold your soap.  (Three bars yielded four cups of grated soap.)  Add essential oil for fragrance if you are going to scent your soap (I used a combination of lavender, lemongrass and rosemary.) and shake or stir it before adding two cups each Borax, washing soda and baking soda.  Shake or stir the entire batch until the grated soap is incorporated throughout the powder. 

I put mine into this container I got from a friend that used to hold some kind of protein powder.

Homemade Laundry Detergent

Finished homemade Laundry Magic and Wide-mouthed alternative container.

But, if your husband does laundry (like mine does) and has giant man-hands (like mine does), you may need to find a wide-mouthed container that he can easily reach into so that he isn’t deterred from doing laundry in the future.  I reused this old laundry soap container.  Best of all, it even came with its own scoop.  I use about 1/4 1/8 cup per load, but you may need to adjust the amount you use based on how hard your water is and how dirty your clothes are.

If you like this recipe you might be interested in my homemade Fabric Softener and Sink Scrub recipes

27 Comments

Filed under frugality, green cleaning, green living

Homemade Dishwasher Detergent

I don’t know about you, but I’m one of those people who loses everything.  Take for example, my recipe for dishwasher detergent.  I’ve been making it myself for months, but I’m not 100% sure that I’ve even used the same recipe every time.  So after scouring the internet for hours looking for recipes, I’ve decided that my actual recipe is a combination of the many recipes available. 

I love this recipe because it works just as well as the poisonous dishwasher detergents without all the toxic chemicals, and it is way cheaper to make it yourself.   I’ll add pictures later, but for now, (See, I told you there’d be pictures. 🙂 )here you go:

Supplies needed to make your own.

Everything you need to make your own dishwasher detergent.

Angela’s Homemade Dishwasher Detergent

2 cups Borax
1 cup washing soda
1 cup baking soda
1 cup salt
1/4 cup  Mrs. Wage’s Citric Acid
30 drops essential oil

Use 1-2 tablespoons per load and fill my rinse agent dispenser with plain white vinegar.

Borax can be found in the laundry section of most grocery stores.  
Arm & Hammer Washing Soda is a little harder to find because not everyone carries it, but it is also found in the laundry section. 
I buy baking soda in giant bags from Sam’s Club because I use it for everything. (Hmm. . . that sounds like a future post.) 
I usually use kosher salt because I always have it on hand, but some people have better results with pickling salt which is actually cheaper.  
Citric acid can be found with the canning supplies.  I bought all the cans they had at Tom’s (the grocery store down the block from me) the first time I made dishwasher detergent.  I’m glad I did because they were the old-style packages and cost $1 less than the new plastic jars do.   I have never done it, but if you can’t find citric acid, you can use unsweetened lemon Kool-Aid.  Other flavors will stain your dishwasher.
I buy my essential oils online because they are cheaper, but you can find good quality essential oils in health-food stores.  You don’t have to add the oil, but it adds a nice fragrance.  Also, some oils have anti-bacterial or anti-fungal properties which are an added bonus.  I like the smell of orange oil, but ever since Swine Flu season started in October, I have been using a combination of clove, lemon, cinnamon, eucalyptus and rosemary which is known as “Thieve’s Blend”.  It has a nice, spicy fragrance and helps naturally sanitize my dishwasher and dishes.

The citric acid will make your powder clump over time (it absorbs moisture from the air) but it is really helpful in preventing haze on your dishes.  If you don’t run your washer often, you may want to make smaller batches so that it doesn’t sit around and get clumpy. 

If you look closely at the picture, you can see a tall, cylindrical container peeking out from behind the washing soda.  That’s the container the old, poisonous Electrasol came in.  I just refill it every time.  Also, I just realized that I forgot to put the citric acid container in the picture.  Oops.

Like green cleaning recipes?

Check out my:

Homemade Laundry Detergent

Homemade Fabric Softener

             and

Homemade Scouring Powder

7 Comments

Filed under frugality, green cleaning, green living

Homemade Dog Biscuits

This summer my kids brought home a stray kitten.  They begged me to keep it.  I actually considered keeping it, but it hated the dog.  I thought maybe they could learn to get along, but while bathing the kitten I discovered it had fleas.  The more I washed it, the more fleas I found.  After some consideration, I decided that the cat had to go.  If it had gotten along with the dog, I might have dealt with the fleas, but I was worried about an infestation and I couldn’t handle the idea of the dog and cat chasing each other around the house nonstop. 

You’re probably wondering, “What does any of this have to do with dog biscuits?”  Well, after I realized how completely infested the cat was with fleas, I started to worry about whether there were fleas on my dog or in my house even though the cat had only been inside for about five minutes aside from its bath. 

I started researching natural flea repellents and remedies online.  My friend Alicia gave me some essential oils to spray on the carpet and furniture to deter fleas and I found some recipes for various dog washes, sprays and supplements to prevent (but probably not kill) fleas.  While I was searching, I came across various recipes for dog biscuits.  Some were designed to deter fleas while others were just tasty treats for your best friend.  I was going to bake up a batch of the flea-repellent biscuits for Luther, but after a few days I decided he didn’t actually have fleas so it never happened. 

Until now.

I’ve been making a Christmas gifts and a while ago I decided that biscuits would be a great thing to give to all my friends with dogs. So, I walked down to the D.O.G. bakery and bought a dog-bone shaped cookie cutter and whipped up a batch of Luther-approved dog bones to give to friends. 

Here is the recipe I developed based on several different recipes I found online.  The garlic and brewer’s yeast make the biscuits flea repellent and the bacon makes them tasty.

Dog Treat Ingredients

The ingredients you need to make tasty dog treats.

Angela’s Homemade Dog Treats

2 1/2 C. flour
1/2 C. wheat germ
1/2 C. brewer’s yeast
1/2 t. salt
2 t. garlic powder
1/4 C. bacon grease
1 egg, beaten
1 C. whey or chicken stock

Preheat oven to 400°F.

Ready to roll.

The finished dough, kneaded and ready to roll out.

Combine bacon grease and garlic powder in mixer bowl.  In a separate bowl or 4-cup measuring cup, combine flour, wheat germ, brewer’s yeast and salt.  In a small bowl, whisk together the egg and the stock or whey.  To the grease, alternately add dry and wet ingredients and mix well.  Knead by hand or with dough hook for two minutes. 

Rolled out and ready to cut.

The finished dough rolled and ready to cut into biscuits.

On a lightly floured surface, roll the dough out about 1/4″ thick.  Use a fork to poke lots of little holes in the rolled dough.  This prevents air bubbles from forming in the treats.  Cut into rectangles with a knife or use a cookie cutter to make bone or other-shaped treats.  Place treats on an ungreased cookie sheet and bake ten minutes.  Remove from the oven, flip the treats over, and return to the oven for 4-6 more minutes until the biscuits are golden. 

Some of the finished treats.

A half-dozen of the finished treats.

Treats will be crispy but sturdy when cooled.  This made about four dozen treats using my bone-shaped cutter, but could make lots more if you used a smaller cutter or a knife to make bite-sized treats.  I used waxed-paper baggies to package the treats in six-packs.

6 Comments

Filed under food, Miscellaneous