
When we brought Fiona home, we housed her in the same old guinea pig cage that we used to brood our chicks for a few days until we could get a hutch built, but we knew we had to build a hutch. First of all, the guinea pig cage was designed as an indoor habitat and the bunnies will be living outdoors; the cage doesn’t offer any protection from the elements. Second, the guinea pig cage has a solid bottom. Rabbits need to have wire on the bottom of their cages to allow all the waste to fall through. Rabbit waste is very corrosive and will eat through solid-bottomed containers. Third, when housing multiple rabbits, it is best to keep them separated. Bunnies are prone to chewing on one another. This can cause injury and infection and destroys the rabbits’ coats. Besides, you don’t want a buck and doe mating like, well, rabbits.
So a rabbit hutch was necessary in short order. I spent some time researching plans online before developing the plans for this hutch:

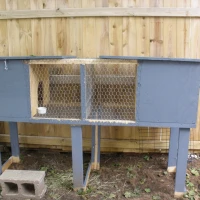
Home to our breeding pair.
Fiona lives in the left half and Nibbler resides in the right. Once Fiona’s kindled a litter, the kits will stay with her for a few weeks before being separated into different quarters. This hutch cost us all of $29.43 to build.
If you need to build something small, I highly recommend that you check out the “cull lumber” bin at your local lumberyard or Big Orange Box Store. You can typically find an assortment of bent or damaged merchandise for 85% off. We got a sheet of 3/4″ plywood for $3.75. REAL plywood, not OSB. The sheet had been cut into three pieces but apparently was not the right size for the original purchaser. We took the two larger pieces and left the six-inch strip behind. We also found two of the three 2x2s that we needed in the cull lumber bin for twenty cents each. The 2x4s we used for the legs of the hutch and the bracing inside the boxes were FREE. They are untreated lumber that was used in/under inventory at the store. It is important that you use untreated lumber because rabbits will gnaw/eat their cages and eating treated lumber is not a good idea. The paint is “oops” paint from the Big Blue Box Store; Valspar’s top of the line exterior paint for $5. The hook and eye latches we paid the full price for: 2/$1.49. The biggest expense was the roll of 1/2″x 1″ rabbit cage wire which cost us $16.49. Using the correct wire on the bottom is important for several reasons. First because of the corrosive properties of rabbit urine. Second, using thin wire can cause injury to your rabbits’ feet. Third, holes that are too large allow predators easy access to your rabbits. We had some hinges and chicken wire leftover from our chicken coop/tractor construction, so we didn’t need to buy cage wire for the front or back of the hutch. Using leftover chicken wire saved us another $12 or more dollars on wire. Hinges probably would have been another $6-10. We also had a supply of screws, nails and staple gun staples in the garage. Fasteners can add up quickly if you have to buy small boxes for every little project you complete.
I may attempt to draw real plans for you in the future, but for now, here are the dimensions of the hutch:
- 2 wooden front panels: 20″ w x 20″ h
- 2 wooden back panels: 20″ w x 18″ h
- 4 side panels (two inside & 2 outside): 23″ w x 20″ h (The sides are sloped with a 20″ height at the front dropping to an 18″ height in the back.)
- 2x2s were used for framing the base. The distance across the front of the entire hutch is about 74″. If I were to do anything differently, it would be to make the hutch a little longer so that the bunnies have more space to move around, but they have about six square feet each.
Because we used a precut sheet of plywood, we had to try to get the most efficient use of the board the way it was already cut. We also had to supplement with a small sheet of plywood left over from a project we finished years ago. Clicking here will give you a scale cutting guide to use if you have a full sheet of plywood. The fronts and backs need to go over the ends of the sides to make the roofs fit. It also makes your hutch look nicer from the front with no seams showing. The size of the boxes is adequate but as I mentioned, you might want to make the “run” portion of each hutch a little bigger. Raising Rabbits by Ann Kanable recommends seven to eight foot per rabbit, so another foot in each run would give you about eight feet.
If my directions seem confusing, please leave a comment and I will try to clarify for you. I am neither an engineer nor a construction worker. I tell my husband what I want and figure out how big to make the pieces and he figures out how to construct it for me.


HI. I’ve been reading your posts for the last week and anxiously watching your buns. I used to raise angoras but my husband strongly disliked them. 🙂 I did want to pop in after reading this post and just offer a couple things from my experience with the rabbits. With your hutch set up the way that it is you may want to be prepared for a few different things. If Nibbler is a persistant guy and Fiona is a willing participant, pregnancy can happen through the divider that you have. If Fiona is at all nervous about having kits next to a buck, canibalism can happen. Not always but it can. It’s what rabbits do in the wild to “protect” their young and themselves if they fear danger. Also, bucks spray. Ick. 🙂 They seem to like to pee up the walls. Fiona may become victim to Nibblers marking. I found that I was able to avoid all of the above mentioned once I put a plywood board inbetween the sides. My husband was able to attatch it in a way that I could remove it if 2 females were being housed side by side but I was able to easily screw it in if I had a doe/buck situation.
Anyways. For what it’s worth, I thought I’d mention it. Best of luck with the rabbits. If only I could get my husband used to the taste of rabbit.
Thanks for the tips. I knew about the spraying, but wasn’t aware of the others. When we add another hutch I may have to separate them, huh? Otherwise a divider in the middle may have to do temporarily. Thanks again and thanks for stopping by!
Hello there! I just discovered your website and I enjoyed going through it. I find lots of useful information here. I have a rabbit which inspires me to search the internet everyday to get new ideas on designs of rabbit hutch. I am actually planning to make a new rabbit hutch for my dear Push… Thank you for the share.
That looks great. I like the resourcefulness of it all. My husband and I have a similar coordination on projects–I do a lot of research and he figures out how to build it. Handy method really! 🙂
The rabbit project is really interesting, will be fun to follow along.
Looking forward to seeing it on the coop loop next year! Need a catchy name – what rhymes with rabbit, or hutch? We might follow in your pawprints some day.
Pingback: February Charcutepalooza: Bacon | Notes From a Country Girl Living in the City
Pingback: Goodbye, 2011 | Notes From a Country Girl Living in the City
Thank you so much for the information. I am going to add to my rabbit collection this year and want to expand the living conditions myself. I keep my rabbits for their manure…
They make plenty of it!
I top-dress my garden beds with a fresh layer of manure each spring. Unlike most manures, rabbit pellets don’t “burn”.
Pingback: 2013~ A Year in Review | Notes From a Country Girl Living in the City