Tag Archives: Can Jam

Rhubarb Two Ways or Canning, Continued.

There are few things that I can’t live without. My KitchenAid Mixer probably tops the list. Coming a close second would have to be my freezers. Yes, I said freezer(s), plural. Of course I have the small freezer that is part of my refrigerator, but I also have a small chest freezer. And a larger, stand-up freezer. Both are mostly full most of the time. Of course, the contents vary from day-to-day and season to season, but I keep them pretty loaded. When things come into season, I try to can as much as possible. Sometimes, I don’t have time to can everything I want before it will spoil, so I freeze the excess until I have time to deal with it. I do that with tomatoes. A lot.

Last year I had an abundance of rhubarb.  I made some delicious Rhubeenas and still had a bunch left over so I chopped it up and threw it into the freezer. With summer’s bounty (and strawberry season) nearly upon us, it’s time to clear some space in the freezers.

 In the first Can Jam, I used asparagus as the May ingredient, but Rhubarb was also an option. Among the rhubarb recipes was a recipe for Rhubarb and Cinnamon Jam from Seasonal Menus. I love cinnamon and have a jar of extra-long cinnamon sticks, so I thought I’d give it a go:

Rhubarb the First Way

  • 2lbs. sliced rhubarb
  • 2 lbs. sugar
  • 3 extra-long cinnamon sticks, broken in half
  • 2 T. lemon juice

Combine rhubarb and sugar in a nonmetallic bowl.
Let macerate overnight in the refrigerator.
Set up canner and boiling water bath; wash and sterilize jars and lids.
Transfer rhubarb mixture to a saucepan.
Add cinnamon and lemon juice.
Heat over medium heat, stirring often until sugar is completely dissolved.
Bring to a boil.
Boil until jam sets.
Remove cinnamon stick pieces, add one to each jar and ladle jam into hot jars.
Process in water bath for 15 minutes.

The cinnamon flavor wasn’t very intense, but I know from experience with my Chai-Spiced Apple Rings that the cinnamon flavor blooms as the jars age. I expect that even the color will turn warmer with time. This recipe made almost exactly five 1/2 pint jars.

For a printable version, click here: Rhubarb Cinnamon Jam Printable Recipe

Rhubarb the Second Way doesn’t help fulfill my Can Jam goals, but it does help me complete my goal to can enough jams/jellies to get us through the year, and it helps me meet my food storage goal. I snagged this recipe from Tigress but made some modifications. First, she used lavender sprigs; I opted for dried blossoms. They looked quite lovely after their overnight in the fridge, but I know from my soap-making experience that the magenta-purple cooks away. She also includes an extra step: “pass (rhubarb) mixture through a strainer and pour collected juice into a non-reactive pan. add honey and bring to a boil. skim any foam that collects on top and continue cooking until 221 F on a candy thermometer.” Afterwards she returns the solids to the boiled juices and re-boils the whole mess. I’m not sure of the point, but her jam was lovely. I myself hate the mess straining creates and don’t do it unless absolutely necessary. Mine tastes delish and has about the same look as hers, so I don’t think it is an essential step.

Rhubarb The Second Way (Honey Lavender Rhubarb Jam)

2 pounds sliced rhubarb
2 1/2 cups granulated sugar
3 ounces light honey
3 T. lemon juice
3 tsp. dried lavender blossoms

1. Combine rhubarb, sugar, lemon juice and lavender blossoms in a nonmetallic bowl. Stir this mixture gently, cover with a plate and macerate in fridge overnight.

2. In the morning, prepare the canner and boiling water bath; wash and sterilize jars and lids. Turn heat down and leave jars in canner until ready to fill.

3. Pour rhubarb mixture into a non-reactive pan. Add honey and bring to a boil.  Continue cooking until the jam is sufficiently set. Process in a hot water bath for 5 minutes.

yields approximately five 1/2 pint or two pint jars.

Again, if you prefer a printable version, click here: Honey Lavender Rhubarb Jam Printable Recipe

Not only did I clear up some space in the freezer, but I’m a quart-and-a-half closer to my jam and food storage goals!

Leave a comment

Filed under 101 in 1001, canning, food

Foraging

Due to the bizarro weather we’ve had around here lately, Mother Nature is all out of whack. Estimates on crop losses from the orchards around here are around 90%. Other edibles that aren’t as sensitive to frosts are ahead of schedule. Take morels for example.

My usual “window” for foraging morels runs somewhere from the 21st of April to Memorial Day. This year, hubby and I started finding those elusive fungi the last week in March. These photos are actually from the first three weeks of April. We did pretty well for a while, and I did dry some to use throughout the winter, but the season that started three weeks early seems to have dried up three weeks early as well. When I went searching on Mother’s Day 2012, I found only one, and that was an accident. It had been kicked over by someone or something and dried out long before I stumbled upon it.

Despite the fact that I didn’t find any morels on this year’s hike, I didn’t come home empty-handed. Dylan and I ran into my friend Stephanie and her kids. They were looking for ramps, so we joined them. Dylan and I came home with a mesh produce bag filled with ramps (or wild leeks). I’ve used some of them in cooking since then, but my real goal was to can them. More precisely, to pickle them.

If you can find them, pickled ramps can be quite pricey. I’ve made them before and everyone that’s ever tried them loves them. However, I’ve become quite a hoarder. I dole them out sparingly to friends and family members that will appreciate them as much as I do. When we open a jar, it is hard not to eat the entire thing. Once all the delicious ramps have been devoured from the pickling brine, I add it to BBQ sauces, marinades and dressings; the flavor is exquisite.

From the bag Dylan and I brought home, I managed to can five half-pint jars. This isn’t enough for me to check #58 off of my 101 in 1001, but it is a good start. It also gets me 1.25 quarts closer to my pickle goal for #53!

For the recipe, check out my Jerked Onion recipe from the Can Jam and substitute whole ramps for the cut onions, or click here for a printable version: Jerk Pickled Ramps Printable Recipe


Leave a comment

Filed under 101 in 1001, canning, food

Let the Canning Commence

Last summer I helped my friend Joan of Olds Farm plant, weed, feed, harvest and shuck her wares. I even dragged the kids along with me a few times. Needless to say, Dylan no longer wants to be a farmer.  In exchange, I received a great bounty of produce and farm-fresh meats. It was win-win.

So, when she called last month and asked me to help her run her tables at the Farmers’ Market for three weeks, of course I said yes. Each week I came home with a giant box of goodies. Spring greens, ground beef, chicken and pork sausages, garlic, leeks, onions and . . . asparagus!

The first week I grilled all the asparagus and spring onions I brought home and consumed them within three days. The second week I brought home a much larger bag of asparagus. I continued to grill and eat large quantities of asparagus, but there was actually enough left over to can and freeze some.

Photo by Tiffany Copeland Godden.

Yesterday, a terrible storm blew in and it rained all morning. At one point, the sky was so black that it appeared to be evening and it was so still I thought there would be a tornado. Yard work was out of the question and the house was nice and cool so  the weather was perfect for canning.

I dragged out the giant bag of asparagus and my pickled asparagus recipe from the Can Jam. The recipe is there in a step-by-step illustrated version, or you can download the printable copy here: French Tarragon Pickled Asparagus Printable

I didn’t get seven jars this time, but I also didn’t weigh/count my spears. I only had these five, tall-ish jars available, so I cut enough spears to fit into the jars. When I was done I had enough asparagus left over for one more dinner and a pint of frozen asparagus.

I’ve never frozen asparagus before and I was afraid it would all turn to mush so I searched The InterWebs for advice. After consulting various “experts”, I decided to take none of their advice and do it my own way. I present to you The Method.

The Method

  1. Clean and cut your asparagus spears.
  2. Fill a CLEAN kitchen sink or large pot with ice and water.
  3. Bring a pan of water large enough to hold all of your asparagus to a boil.
  4. Set a timer for one minute.
  5. Rapidly add all the cut pieces of asparagus to the boiling water.
  6. As the timer counts down to zero-ish, remove the pan from the stove.
  7. Quickly drain the asparagus and add the hot pieces to the ice bath.
  8. Stir the spears around in the bath to quickly cool them.
  9. Remove the cut pieces to a towel to drain.
  10. Spread the cooled pieces onto a plate or cookie sheet and place in freezer.
  11. After the pieces are individually frozen, place them in a freezer container.
1 pint frozen asparagus

Yum.

Okay, so most people blanch their asparagus, but I did it for less than a minute and I was really quick about getting it into the ice bath. Conflicting info from the internet makes me wonder if this will help at all, but I’m hopeful. They look beautiful at least.

Storage count: 2.25 quarts pickles.5 quarts frozen vegetables

1 Comment

Filed under canning, food

January Spice Rack Challenge: Rosemary 3 Ways

I found several different recipes that I wanted to try for this month’s Spice Rack Challenge but in addition to the Spice Rack Challenge, I still have my 101 in 1001 to think about.  So, I opted for recipes that would allow me to do double duty.  Cheating?  Maybe.  Efficient?  Definitely.   Besides, is it cheating if I do three posts with three different rosemary recipes?

Buffalo Stroganoff with Rosemary and Morels over Homemade Pasta


All three recipes turned out great.  First I made homemade pasta with rosemary, garlic and cracked pepper.  Several days later I used the pasta as a base for a Dark Days dinner of Buffalo Stroganoff with Rosemary and Morel Mushrooms.

Finished Rosemary-Lemon Marmalade

 I also made Rosemary/Meyer Lemon Marmalade.  I can honestly say it was the best marmalade I have ever made.  It was part of Tigress’ Can Jam round up last year and originally came from Prospect the Pantry.  I should share this marmalade, but I think I will end up hoarding it.

I also made Rosemary Lemon Muffins.  I intended to make Rosemary Lemon cupcakes, but I toyed with the recipe and ended up with more of a muffin.  I found three different recipes for lemon cupcakes and married them.  The result is a light but sweet rosemary/lemon corn muffin.  The flavor is excellent and I think I will make them again, but I will go back to the original recipes and tinker a little more first.

Rosemary/Lemon Muffins

  • 1 1/2 cups sugar
  • 1 stick real butter, melted
  • 4 eggs, room temperature
  • 1 1/2 cups flour
  • 1 1/2 cups corn flour (flour, not the grittier meal)
  • 1/4 tsp. salt
  • 1 tsp. baking soda
  • 1/2 cup milk
  • zest from 2 lemons, divided
  • juice from 2 lemons
  • 1 T. fresh minced rosemary, divided
  • 1/3 cup sugar

Preheat oven to 350 degrees.

Cream melted butter and sugar until fluffy.  Add eggs one at a time mixing thoroughly after each.  In a separate bowl combine flours, salt and baking soda.  Alternately add 1/3 of dry ingredients and 1/3 milk to wet ingredients mixing after each addition.  Add lemon juice, half the minced rosemary and half the zest; mix for one minute more.

Ready for the oven


Combine remaining zest, rosemary and 1/3 cup sugar.  Reserve.

Spoon batter into greased muffin tins.  Fill each tin half full. Sprinkle Rosemary-Lemon Sugar onto each muffin.  Bake 17-20 minutes.

Rosemary Lemon Muffin

I used jumbo muffin tins so mine needed to cook 23 minutes.

Feeling inspired?  Have a good rosemary recipe?  There’s still time for you to join the Spice Rack Challenge.  Hop on over to Mother’s Kitchen to sign up and post your recipe before Friday January 21st.

9 Comments

Filed under canning, food

#57 ~ Can my way Through Tigress’ 2010 Can Jam: (January/Citrus) Rosemary-Meyer Lemon Marmalade

If you have never canned before, Tigress has lots of inspiration and information to get you started.  If you are a seasoned canner, she has more recipes linked/posted than you’ll probably ever be able to can!  Last year I participated in Tigress’ 2010 Can Jam.  All my recipes are here if you’re interested.  I tried lots of things I wouldn’t have tried without the motivation of a blog challenge.  Some of them I’ll definitely make again like Herbed Strawberry-Balsamic Jam.  Others like my Lemon-Ginger Marmalade will be passed over (or at least modified before they are tried again).

This year Tigress has a different plan so we are, so far, Can Jam-less.  I still want to can regularly and I still sometimes need a little extra motivation so I decided that canning my way through the old recipes would be a good way to keep going.

My inspiration for January’s challenge comes from Prospect: The Pantry.  She tried Meyer Lemon Marmalade three ways.  All three varieties sounded delicious to me but the featured spice for the January 2011 Spice Rack Challenge is rosemary so this seemed like the natural choice.  Besides, as much as I love ginger, I tried a lemon-ginger marmalade last year.

Rosemary-Meyer Lemon Marmalade

About 8 Meyer Lemons (yields ~ 3 cups sliced)
1 7/8 cups water
About 2 1/4 cups sugar
Fresh rosemary sprigs

Lemons and Rosemary

Prepare the lemons.  Wash them and quarter them lengthwise.  Remove the seeds and the pith from the center; set aside for later.  Slice the quarters into 1/8″ slices.

Combine the lemon slices and about 1 7/8 cup water in a large saucepan.  Add a large (2-3″) sprig of rosemary to the pot, bring to a simmer over medium-high heat.  Cook for 5 minutes, cool, cover and set aside overnight in the refrigerator. I actually let mine steep for three days because I couldn’t get back to it any sooner.

Place a saucer in the freezer to test for set later. 

Prepare boiling water bath and clean jars/lids.

Remove the rosemary sprig from the lemon slices and add it to the seeds you have saved.  Return the pan to the stove and simmer about 15 minutes.   Measure the lemon mixture and add 3/4 cup sugar for every cup of lemons.  I had three cups of lemon/juice so I added 2 1/4 cups of sugar.  Wrap the reserved seeds and the rosemary sprig in a section of cheesecloth and tie it with a string. Put the lemons, sugar and cheesecloth into the pan and cook at a medium boil for about 25 minutes or until a spoonful of marmalade dropped onto the frozen saucer doesn’t run.

Finished Rosemary-Lemon Marmalade

Remove the cheesecloth and ladle marmalade into hot jars.  Process in boiling water bath for ten minutes.  Turn off stove and let jars rest in bath for 5 minutes.  Remove to counter to cool undisturbed.

This recipe made three half-pint jars plus enough left over for me to sample.  I’m glad I tried this recipe because after last year’s trials with marmalade I was close to giving up.  The set is perfect on this batch and the flavor is wonderful like lemonade in a jar.  The rosemary flavor is very subtle.  If Meyer Lemons weren’t SO expensive I’d go buy some and make another batch right now.

5 Comments

Filed under 101 in 1001, canning

Goodbye 2010, Hello 2011

The start of a new year is always a time for reflection on the past, and hope for the opportunities yet to come.  This year my family starts with some setbacks, but I am optimistic that the future will be bright despite the hurdles before us.

Although this blog was “born” in 2009, last year was my first full year blogging.  Sometimes I did a better job than others.  Posting regularly was a challenge for me at times but I hope to have a better go of it this year.  I’m not going to resolve to post daily or even weekly, but I think that posting more frequently is a good goal, as ambiguous as it is.  Challenges like the Spice Rack Challenge with its required monthly posts and the Dark Days Challenge with bi-monthly posts until April will help me stay motivated, but so will various things on my 101 in 1001 list (which I fully intend to complete).

But, as a farewell to the year gone by I present:

The Top Ten Posts of 2010

  1. Homemade Fabric Softener
  2. 28 Day Challenge Final Results
  3. June Can Jam~ Herbed Strawberry-Balsamic Jam
  4. Crusty Round Loaves of Homemade Bread
  5. How I Made Homemade Soap (and Didn’t Screw it up)
  6. Lavender’s Blue . . . (April Can Jam)
  7. How to Make Your Own Soap (Concluded)
  8. Homemade Laundry Detergent
  9. Everything but Apple Jacks?
  10. Can Jam Challenge Round Three ~ Jerked Onion

I was surprised that some of the posts made the list, but in general I wasn’t.  This blog is (mostly) about me getting back to slower times, cooking and cleaning in a way that is more sustainable.  So I shouldn’t be surprised that most of the posts on the list are in that vein: recipes for homemade food, instructions for preserving your harvests and recipes for cleaning in a more gentle manner. 

And, I was glad to see my three favorite canning recipes make the list!

Happy New Year,

Angela

Leave a comment

Filed under canning, food, green living, Miscellaneous

December Can Jam ~ Pear/Dried Apple Chutney

When I went home for Thanksgiving, my father treated us to a pork tenderloin stuffed with a pear/dried pear filling.  Dad was pretty proud of the pork loin; it was delicious despite the inclusion of cilantro which I despise.  The timing was perfect.  This month’s Can Jam ingredient is dried fruit.  The real challenge however was converting the recipe into something can-able.  This recipe is my attempt to can the filling for future use (and possibly a Christmas gift or two.)  The original pork loin also featured a maple glaze; that recipe will be my next canning project.

Cilantro free.

Dried Apples and Chiles

Pear/Dried Apple Chutney

3 Cups green Bosc pears, sliced
2 Cups Mutsu apples, sliced
1 Cup chopped fennel
1 1/2 Cups Champion Hill Farms honey
1 Cup apple cider vinegar
1 quart dried apples (Maple Ridge Orchards Golden Delicious)
2 small red onions
4 cloves garlic
5 dried chiles chopped finely

Combine all ingredients in a heavy-bottomed pan.
Simmer over medium heat until all ingredients are well blended.  Keep chutney hot while preparing  jars and a boiling water bath.
Fill hot jars with chutney.
Remove air bubbles, add lids and rings and process in the boiling water bath 10 minutes.

I traded the fennel for the cilantro the original recipe called for.   Apple and fennel usually work well together; hopefully the flavors will bloom with time.  Use chutney to stuff cuts of meat or top fish.

1 Comment

Filed under canning

Chai Spiced Apple Rings? ~ November Can Jam

When the theme for this month’s Can Jam was announced, I was excited.  Apples are just about the perfect choice for me now.    They are in season and in abundance here and I have a lot of experience with them.  I’ve been thinking about this for a while.  I wanted to try something new and exciting.  Rosemary Apple Butter?  Apple Chutney of some exotic variety? 

I’ve never made an apple butter.  The term “apple butter” has always kind of turned me off to it.  I don’t know why; it’s just one of those things. 

Chutney seems exciting, but it intimidates me.  Not because I don’t think I can make it, but because I don’t know what the heck I’d do with all those jars of chutney once I canned them.  Put them on the shelf to look pretty?  Eat them out of the jar with a spoon? 

So, as much as I really wanted to try something daring and new, I decided to stick with something familiar.  Last year I canned cinnamon apple slices for the first time.  They were delicious, but the experimental jar I made with chai spices was fabulous.  I actually ate the whole jar with a spoon.  Okay, I actually used a fork but the point is that once I started eating them I couldn’t stop.  So I present to you:

Apple sauce or apple rings?
Chai Spiced Apples

Chai Spiced Apple Rings
Made just over 7 pints.
(Based on a recipe I found at Myownlabels.com)

  • Vinegar-salt solution:
  •  2 Tbsp white vinegar
  •  2 Tbsp salt
  •  1 gallon cold water
  • 10 lbs. Apples  (I used 3 lbs. of Ida Reds from my 9 Bean Rows CSA share, 6 lbs. of Ida Reds from Maple Ridge Orchards and a pound of Jonathan apples from Maple Ridge .)
  • 4 cups sugar
  • 1 quart water
  • 2 T. cinnamon
  • 7 candied ginger medallions
  • 1 one inch piece of vanilla bean
  • 42 cardamom seeds
  • 42 pepper corns
  • 14 cloves
  • 7 star anise
  • 7 cinnamon sticks
Automatic apple slicer thingy

Dylan slicing apples


Mix salt and vinegar in 1 gallon of cold water; stir until salt is dissolved.
Wash, peel, core and slice apples and submerge the slices in the vinegar brine to prevent discoloration.  I like to use my handy-dandy apple slicing machine which peels, cores and slices all at once.  (And no, that’s not an Ida Red on the slicer, it’s a Yellow Delicious we dehydrated.)

Mix sugar, water, candied ginger, vanilla bean and cinnamon in a large sauce pot. 
Bring syrup to boil and boil gently for five minutes.
Remove syrup from heat and add apples.  
Allow the apples to rest in the syrup for ten minutes. 
Return pan to heat, bring to boil and simmer for 30 minutes.
Remove from heat and cool thoroughly.

While the apples and syrup are cooling, prepare your jars, lids and boiling water bath (BWB): Wash jars and caps.  Place rack in canning pot and add jars.  When the apples are nearly cool, bring the BWB to a boil.  Turn down heat but keep jars in simmering water until ready to fill.

Once the apples and syrup have thoroughly cooled, remove apple slices and vanilla bean.  Cut vanilla open and scrape the seeds out.  Add the vanilla seeds to the syrup and return to a boil.

ready for fruit

Aromatics in the hot jar awaiting the addition of apples and syrup.


When the syrup is ready add one of the candied ginger medallions, a star anise, 6 peppercorns, a cinnamon stick, 2 cloves and 6 cardamom seeds to each prepared jar.
Pack the apple slices loosely in hot jars.
Fill the jars with boiling syrup leaving 1/2″ head space.
Wipe rims of jars, add lids and rings and process pint jars in BWB for 15 minutes.
Try not to open the jars for a few weeks to allow the spices to have time to really mingle in the jar.

The verdict:
If my goal was spiced apple rings, this recipe was an EPIC FAIL. 

This could be for two reasons (that I can think of; there are probably numerous other reasons that I haven’t even considered). 
The first reason is that I soaked the apples too long which caused them to soak up a lot of water and turn to mush when I cooked them.  I’m not sure that this is the reason because some of the apples kept their shape despite being soaked. 
The second (and most logical) reason some of the apples turned to mush is that they have been stored outside for three weeks.  Yes, it is cool outside now, but we’ve had many sunny, warm days.  Apples like to stay cool all the time, not just most of the time.  Some of the apples kept their shape beautifully.  While I can’t identify individual apples from the slices in the jars, I’m assuming that the CSA apples that I got Saturday morning are the apples that held their shape. 

Maybe I did make a chutney after all.

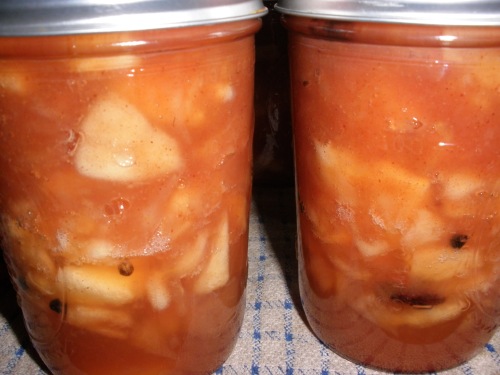
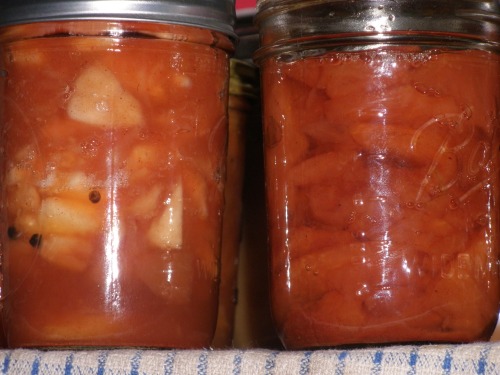
The jar on the right is a jar of spiced apple slices from last year. The jar on the left is the sauce? Syrup? Chutney? I made today.

HOWEVER, if my goal was a syrupy-sweet apple sauce, or an amazing topping, this recipe was a complete success.  The vanilla added a heavenly aroma and subtle flavor even when mingled with the other powerful spice flavors.  I think this will be a great addition to our Christmas brunch on pancakes and waffles or served with homemade vanilla ice cream.

5 Comments

Filed under canning, food

October Can Jam ~ Festive Chile Pepper Cranberry Sauce

Summer is officially over.  Apples, pumpkins, squash and root vegetables have over taken the markets.  Leaves are steadily dropping from the trees, birds are heading south and there is a noticeable nip in the air.  Fall is here in full force.  So imagine my surprise when Kaela at local kitchen announced that this month’s featured ingredient would be chiles.

Don’t get me wrong, I love chiles but I was expecting something a little less summer-y.  The weather here has had me thinking of soups and oven-roasted meals for weeks and I’ve been thinking of Thanksgiving lately.  Thanksgiving means cranberry sauce.

Last year I jarred up some Michigan cranberries into delicious, high-fructose-corn-syrup-free sauce.  I made some with whole berries, and some smooth, jellied sauce that took on the shape of its jar so that the kids could have a cylinder of cranberry sauce just like they used to get from the grocery store. 

But, I need to can chiles!  Time to get creative.  How can I combine chiles and cranberries?

I haven’t found any Michigan cranberries yet, but I did have two bags of cranberries left in the freezer from last fall.  I dragged one out and turned it into this:

Festive Chile Pepper Cranberry Sauce

12 oz. frozen cranberries
1 cup water
1 cup sugar
1 large, mild red chile, diced

Whole red chile

Seeded and ready to chop.

3 teaspoons lemon juice
1/3 cup pinot noir

From the folks at Blackstar

Its so delicious, I hated to pour it in my sauce but it was worth it.

In a non-reactive saucepan, combine water and sugar and bring to a boil. 
Add cranberries, diced peppers and lemon juice.Cranberries in boiling simple syrup
Return mixture to a boil; reduce heat and simmer for five minutes.
Add wine and simmer five minutes more.
Pack hot jelly into hot jars leaving 1/2″ headspace; process in a boiling water bath for five minutes.

Chile Cranberry Sauce

One lonely jar.

This made enough to fill one 12 oz. jelly jar with enough leftover to sample.

Is it good on biscuits, too?

If a spoonful of sugar helps the medicine go down . . .

I’ll definitely be making this again because this jar is already accounted for.  The pepper flavor isn’t overwhelming but it has a kick.  This was good straight out of the pan but would be really great on roast chicken, pork or turkey.  I think it would also balance smoked poultry really nicely.

1 Comment

Filed under canning

September Can Jam~Spiced Peach Jam

I love peaches.  Mostly I love them fresh, but grocery store peaches in the winter shipped from who-knows-where are not tasty so I don’t buy them anymore.

I also love jam.  So, what could be better than peach jam?  Spiced Peach Jam.

I love this jam so much that I had to make another batch after I tried the first.   I buy my peaches at the Farmers’ Market.  I have a favorite booth for stonefruits and tomatoes.  They always have a peck of peach “seconds” for me.  I think I paid $3 for a half peck of soft peaches.  We always eat a few but I got most of them into the jam:

Spiced Peach Jam

  • 3 lbs peaches skinned and cut into 1 inch pieces
  • 3 cups sugar
  • 6 coins of candied ginger chopped into little bits (almost minced)
  • 2 tsp.  lemon juice
  • 2 cinnamon sticks
Spiced Peach Jam

Yum!

Combine all in a large, non-reactive pan and simmer until set.  I always use the chilled plate method to test my set. 
Sterilize your jars by boiling in a hot water bath.
Ladle hot jam into hot, sterilized jars and process in boiling water bath for ten minutes.

The jam improves with time as the ginger diffuses into it.  I like it on PB&J sandwiches, but I love it in homemade yogurt!

7 Comments

Filed under canning